Guide for Basic Integration
Call-flow Diagrams of Basic Integration of a New Company with Cloudike PAYG Platform
Pre-launch Integration
Company and Cloudike Approve Together:
Technical Endpoints:
- SMS Gateway (SMPP or custom HTTP REST interface to send SMS from Cloudike PAYG) – see documentation
- REST API Interface to integrate with Cloudike PAYG – see documentation
Packages Configuration:
List of subscriptions available for end Users:
- ID
- Human-readable name
- Size (GBs)
- Cost
- Currency
- Period of renewal (days, months, years)
Trial subscription parameters for just-registered user accounts.
Documents:
Terms of Usedocument (public offer for user’s agreement during sign-up)
Branding:
- Name of apps
- Design and logo
Sign-in / Sign-up Flow
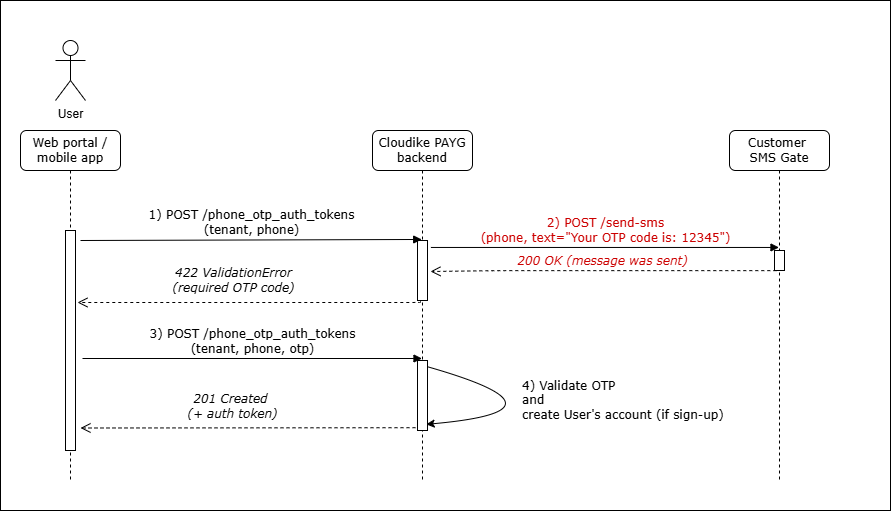
- Client inputs phone number from the user, approves them with the public offer document, and calls the Cloudike PAYG backend method/phone_otp_auth_tokens.
- Cloudike PAYG backend generates a random OTP (One-Time Password) and sends it via Customer’s SMS Gateway using:
- SMPP protocol or
- Special REST API method on Customer’s side.
- User inputs OTP code from the SMS message into the client.
- Client validates the OTP on the backend.
- If OTP is correct:
- A new user account is created (if it's a sign-up).
- [OPTIONAL] Trial subscription may be granted.
- Backend responds with a session key token.
Purchase Subscription – By User
This diagram describes the initial purchase (or activation) of a subscription by a user in any Cloudike client:
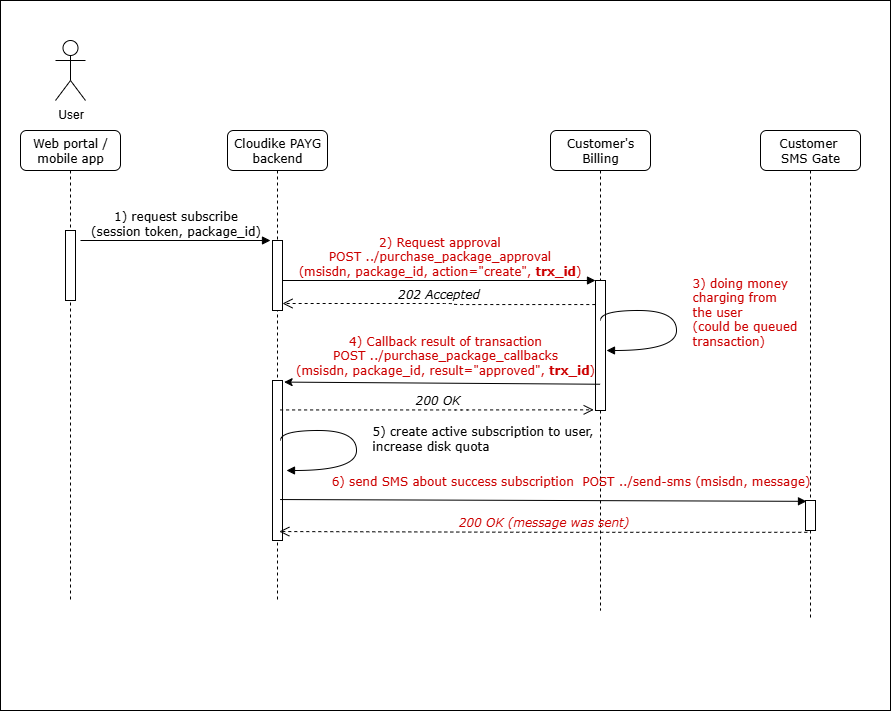
- User selects a subscription in the app and requests Cloudike PAYG backend to purchase it.
- Cloudike PAYG backend:
- Generates a transaction ID
trx_id - Requests approval to purchase from Customer’s billing (see docs).
- Generates a transaction ID
- Customer billing charges the user (identified by
msisdn).- If successful: responds
200 OK - If failed: responds
400 Bad Request - If deferred: responds
202 Acceptedand queues the request
- If successful: responds
- Billing completes the deferred charge and informs Cloudike PAYG backend using the same
trx_id. (See API method description) - Cloudike PAYG backend:
- Creates the subscription
- Updates disk quota
- Cloudike PAYG backend sends SMS to User about successful subscription.
Renewal of Active Subscription – By Cloudike PAYG
The diagram describes the regular procedure of renewal (or prolongation) of an active user's subscription.
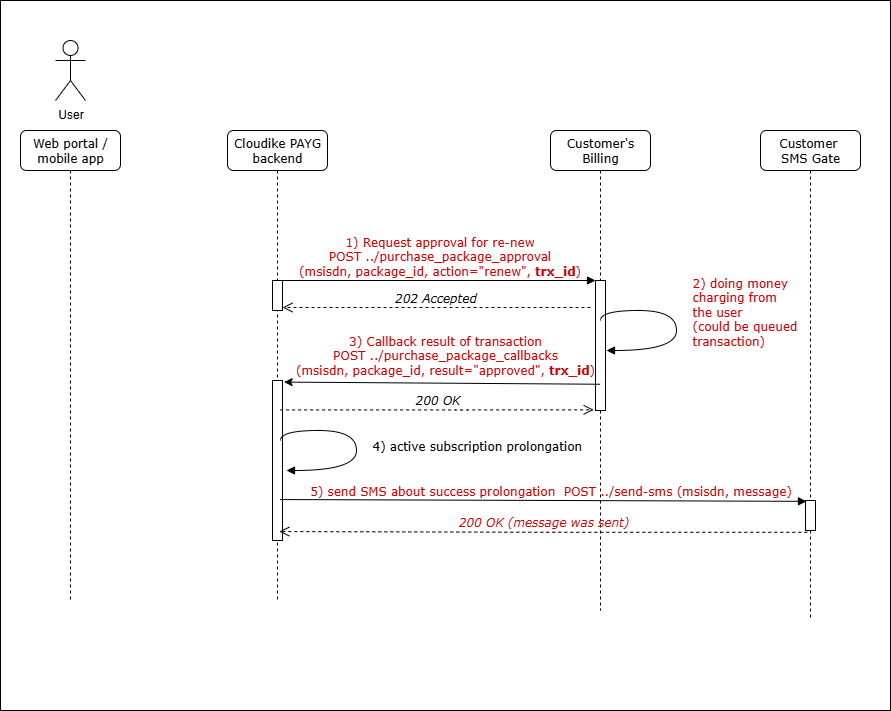
On the last day of the previously prepaid subscription period, the Cloudike PAYG backend automatically attempts to prolong the subscription for the next payment period. It makes up to 6 attempts, spaced 8 hours apart, to get approval from the Customer’s billing system. If all attempts fail, the backend will automatically cancel the user’s subscription.
Step-by-Step Flow:
-
Cloudike PAYG backend generates a transaction ID
trx_idand requests approval to charge the subscription cost from Customer’s billing.
The related API method is documented. -
Billing system response:
200 OK: Charge approved400 Bad Request: Charge declined202 Accepted: Charge deferred; request is queued for later processing
-
Billing performs deferred charge from the user.
-
Billing notifies Cloudike PAYG backend about the result of the deferred charge, using the same
trx_idas in Step 1. (See API method description) -
Cloudike PAYG backend:
- Prolongs the prepaid subscription details
- Prepares the renewal automation for the next period
- Sends an SMS notification to the user’s MSISDN confirming successful renewal
Cancellation of Subscription – By User
Cancellation of the user’s active subscription occurs by a request from the client application to the Cloudike PAYG backend.
This action does not involve the Customer billing system — it simply disables the auto-renewal process on Cloudike’s side.
The subscription remains active until the end of the current prepaid period.
When the current prepaid period ends, the subscription is automatically unsubscribed.
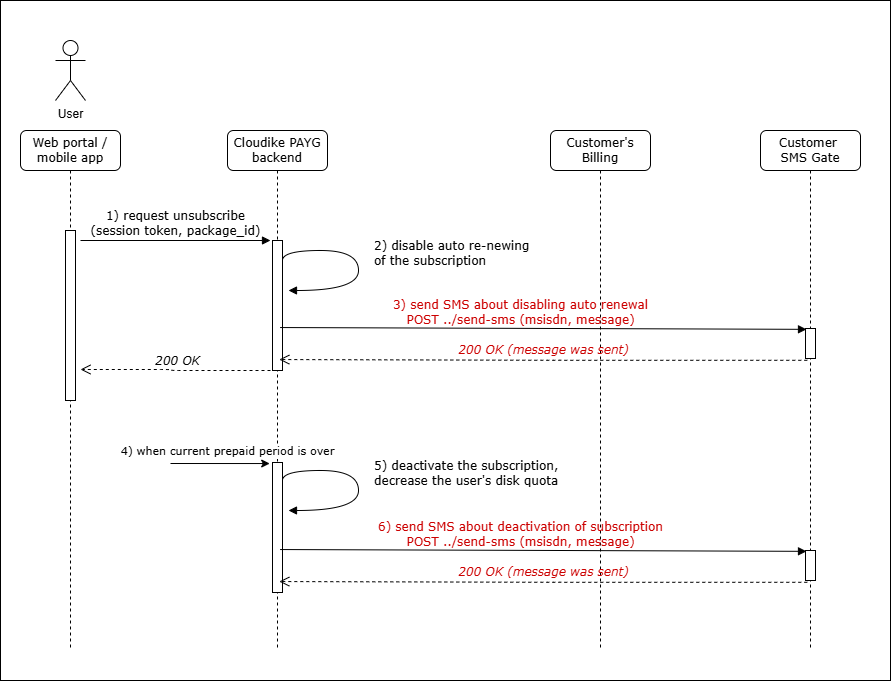
Cancellation Flow
- User initiates the unsubscription request from the client.
- Cloudike PAYG backend disables the auto-renewal flag for the user’s subscription.
- Backend sends SMS to the user informing them that:
- Auto-renew has been disabled
- The subscription will remain active until a specific expiration date
- When the expiration date is reached:
- Backend runs the automatic unsubscription procedure
- Subscription is deactivated
- User’s disk quota is reduced accordingly
- Backend sends SMS notification to the user confirming subscription cancellation.