Using Windows Desktop App
The system tray icon
Once the Cloudike desktop application is downloaded to your computer, you will see the Cloudike icon located on the tray of the Windows task bar. If you double click on the icon, the desktop application will open and you can view your files and folders. From the desktop application you can create, share, and manage your folders. Anything that you do in the desktop application, such as upload files, will sync with the Cloudike website and will be stored in the cloud. You can also right click on the tray icon which gives you the option to view your desktop Cloudike folder, go to the website, view recently updated files, and change settings for the desktop application.
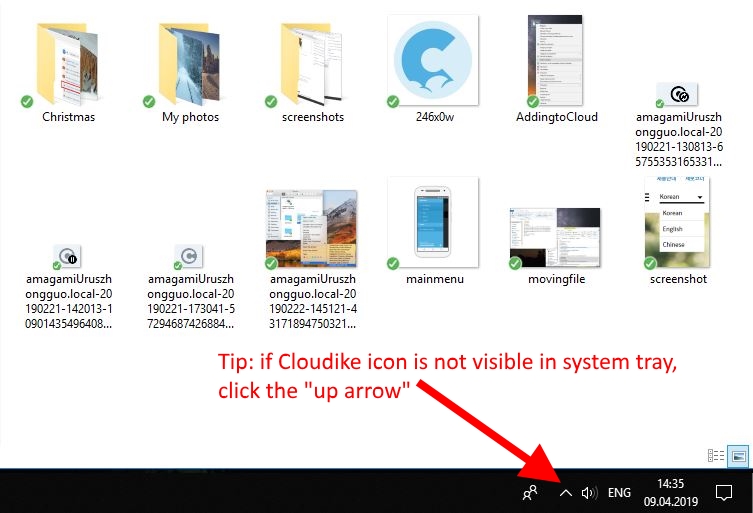
If you don’t immediately see the Sync icon in the system tray after installation you’ll need to click the show hidden icons arrow first (the white up arrow)!
So, the Cloudike system tray icon serves a number of purposes:
- It provides a visual cue as to the status of Cloudike. For example the Cloudike icon spins when files are being transferred, and displays a checkmark when syncing is complete.
- It provides easy access to your Cloudike folder, the web panel, technical support and app preferences (settings).
The status icons in the system tray or menu bar of your computer
The Cloudike icon in the system tray shows the overall status of Cloudike and indicates the synced status. There are several Cloudike icons that appear in the system tray or menu bar of your computer:
Table 1. Cloudike System tray icons
| Status | Description |
|---|---|
| Synced. If the Cloudike app is fully synced, the icon is solid, either black or white depending on your operating system. | |
| Sync in progress. If Cloudike is in the process of syncing, the icon appears with a syncing symbol in the lower right corner. | |
| Paused. If the Cloudike app is paused, the icon is faded with a paused symbol in the lower right corner. | |
| Proxy Settings are incorrect. If Proxy settings are not set, the icon is faded with an X-symbol in the lower right corner. | |
| Sync not happening. The red circle with the exclamation mark means that something is wrong, and Cloudike isn’t syncing this file or folder. There are a few common reasons for this: 1. Invalid filenames (files can’t sync if their names have certain characters or symbols). 2. Permissions errors (meaning you don’t have access to shared content, or a computer system permission). 3. File changing very rapidly (meaning multiple edits in quick succession). 4. Your Cloudike account is out of storage space (which means you can't upload to it) | |
| Not connected. If the Cloudike app on your computer can't connect to Cloudike servers, the icon is faded with an X-symbol in the lower right corner. | |
| The following operations are available by clicking the system tray icon. |
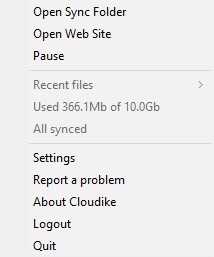
Right click options available from the Cloudike tray icon
The description of Cloudike Tray Icon Menu Operations are presented below:
Table 2. Cloudike tray icon menu operations
| Operation | Description |
|---|---|
| Open Sync Folder | Opens the Cloudike sync folder that shares files with other devices that have the Cloudike client installed and connected to your account. |
| Open Web Site | Opens the web-portal saas.cloudike.com |
| Pause | You can pause Cloudike Application by using this operation. Click Continue to continue syncing files and folders with the Cloudike application. |
| Recent files | Hover over Recent files to view files recently added to the Cloudike application. |
| Settings | Click Settings to enter the desktop app common, proxy and sync settings. |
| Report a problem | You can contact Cloudike support team and report a problem. |
| About Cloudike | This is the current version of your Cloudike installation. Reference this number in support cases or to see if you have the latest version of Cloudike. |
| Logout | You can logout of the Cloudike application in the tray icon menu. |
| Quit | Click Quit to exit application. |
Desktop App Settings Menu
The desktop app settings menu allows you to configure and customize the Cloudike app to your liking.
How to access the Settings menu
- Right-click the Cloudike icon in the system tray or menu bar of your computer.
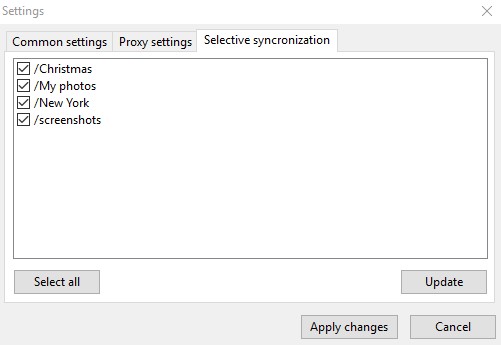
- Select Settings from the menu. You will see the Settings menu which has the following submenus: Common settings, Proxy settings, Selective syncronization.
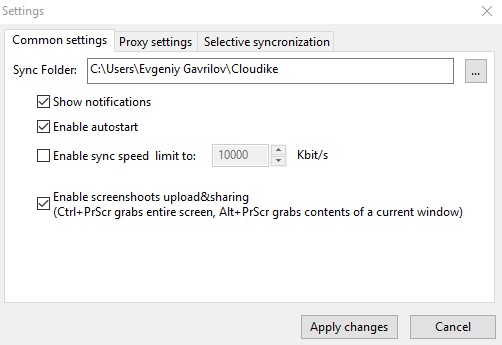
Windows Desktop App Settings
The description of Windows Desktop App Settings are below:
Table 3. Windows desktop app settings
| Settings | Description |
|---|---|
| Common Settings | |
| Sync Folder | This option changes the location of your Cloudike folder. Typically your Cloudike folder is installed in your user folder (the folder named after your login). However, you can choose any location on your hard drive with this option. |
| Show Notifications | The desktop application can display notifications on your computer when changes are detected in your Cloudike account. Check the box to receive notifications. |
| Enable Autostart | You can have Cloudike launch automatically whenever you start your computer. This option is recommended in order to keep your Cloudike folder synced online and to other computers at all times. |
| Enable sync speed limit to: | Limit the sync speed by entering your own sync speed limit in kilobytes per second. Entering "0" will tell Cloudike to sync at the fastest speed available. |
| Enable screenshots upload&sharing | You can have screenshots upload to Cloudike automatically whenever you take a screenshot (Ctrl+PrScr grabs entire screen, Alt+PrScr grabs contents of a current window). You’ll also get a link to this screenshot so you can easily share it with others. |
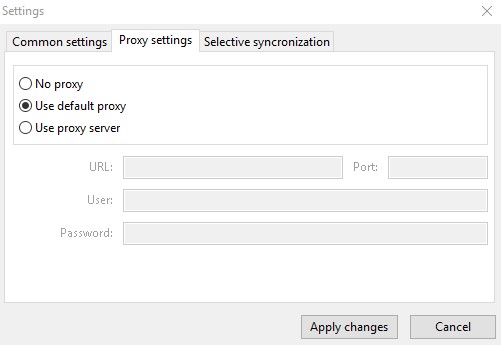
| Proxy Settings | |
| No proxy | Choose no proxy server to tell Cloudike if you don't use a proxy server. Choosing this option may bypass some issues that occur when Cloudike attempts to find a proxy server and fails. |
| Use default proxy | This option will let Cloudike auto-detect your proxy settings. Select this option if you are unsure if your internet connection requires a proxy server. |
| Use proxy server | Select this radio button to allow you to enter your proxy settings manually. This option is typically for users or administrators who have a non-standard proxy server configuration. |
| Selective Syncronization | |
| Select/Select all | Selective sync lets you choose which folders from your Cloudike online account sync to the Cloudike folder on your computer. If you deselect a folder, it won't appear in your Cloudike folder, but it's still in your account on saas.cloudike.com. We recommend you use selective sync for files you don't use very often. When you have multiple computers running the desktop app you may want to control which folders within your Cloudike folder get synced to each computer. This is accomplished via selective sync. By configuring selective sync you choose which folders sync to each computer. Selective sync is configured per computer, and typically used when you have a primary computer with many files taking up lots of space, and a secondary computer with limited space. You would uncheck folders on the secondary computer to ensure it doesn’t run out of space. |
How do I open a file or a folder in browser or get a public link?
-
Open the Clouduke folder on your computer:
A. Right-click the Cloudike icon in the system tray or menu bar of your computer.
B. Choose Open Sync Folder -
Locate the content that you want to open in browser or to get public link to:
A. Right-click the file or folder.
B. Choose Cloudike: Open in browser
C. Choose Cloudike: Get public link
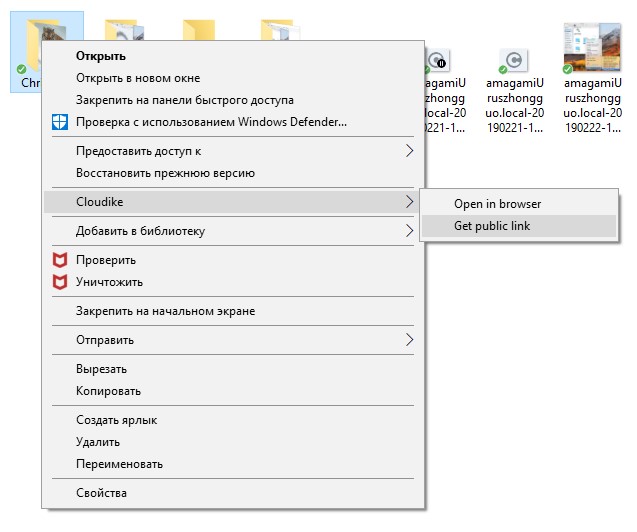
Opening a file or folder in browser or getting a public link to it
How to upload files to Cloudike
-
Open the Clouduke folder on your computer:
A. Right-click the Cloudike icon in the system tray or menu bar of your computer.
B. Choose Open Sync Folder -
Drag and drop or copy and paste content into the Cloudike folder.
Moving a file or folder to the Cloudike Folder
After placing the new files and folders into Cloudike, the client will automatically sync them to your account in the background. Cloudike uses an automatic method of file synchronization. When you place a file into the Cloudike folder the client on your computer immediately and automatically attempts to send that information to the Cloudike server, which in turn immediately and automatically attempts to make the information available to all of the devices you have installed the client on.
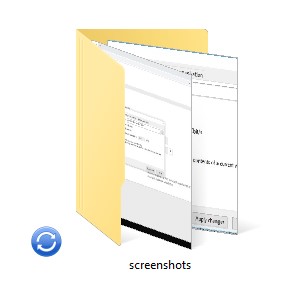
The blue icon means your file’s syncing with Cloudike.
The green icon means that your file has finished saving to your other computers and the Cloudike website. Now that your file’s in Cloudike, any changes made to it will be automatically detected and updated to your other computers.
You can access files in the Cloudike folder on your computer even when you’re offline. That's because copies of these files are also stored on your hard drive. If you edit a file while you're offline, Cloudike will sync these changes the next time you're online.
How to add files to Cloudike
- Right-click the file or folder you would like to add to Cloudike.
- Choose Add to Cloudike from the menu.
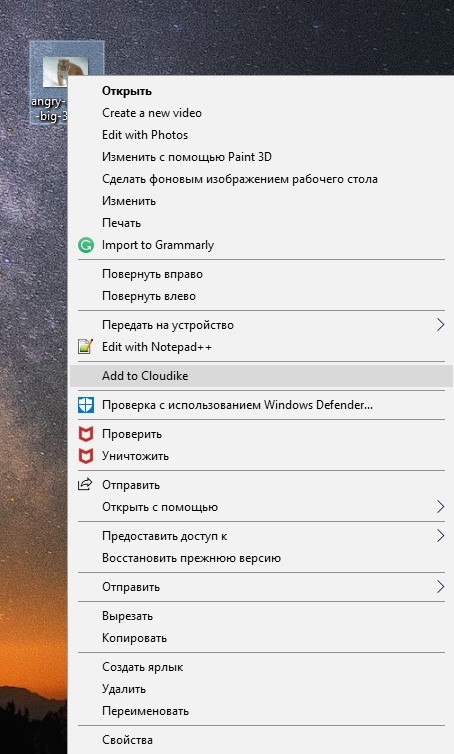
Adding a file or folder to Cloudike
You can also open a file, click "Save as," and save to Cloudike as the location.