Installing MacOs App. Making Initial Settings
The Cloudike desktop application is available for macOS operating system. Once installed, the app creates a Cloudike folder on your computer. The Cloudike folder shares files with other devices that have the Cloudike client installed and connected to your account. Cloudike folder works like any other folder on your computer. You can drag and drop (or right-click) files to move them into your Cloudike. They will automatically sync, and you will be able to access the latest versions from anywhere. So, this folder works just like any other folder, but with a few important differencies:
- Files stored in the Cloudike folder are backed up to Cloudike
- These files automatically become available on any computer, phone, or tablet you’ve linked to your Cloudike account
- Changes you make to files in the Cloudike folder are automatically backed up to Cloudike
- Changes you make here also sync to the Cloudike accounts of people you have shared the files with
- You can access files and folders that others have shared with you
With the Cloudike desktop app, files are stored in the cloud, but a "backup" copy is also stored in the Cloudike folder on your computer; files in this folder still use storage space on your hard drive.
To install MacOS Desktop App, take the following steps:
- Visit the page https://saas.cloudike.com and download the installer.

Downloading MacOS Desktop Application
- Once downloaded, click the downloaded file to run the application. The following page appears.
Installing the MacOS Desktop Application
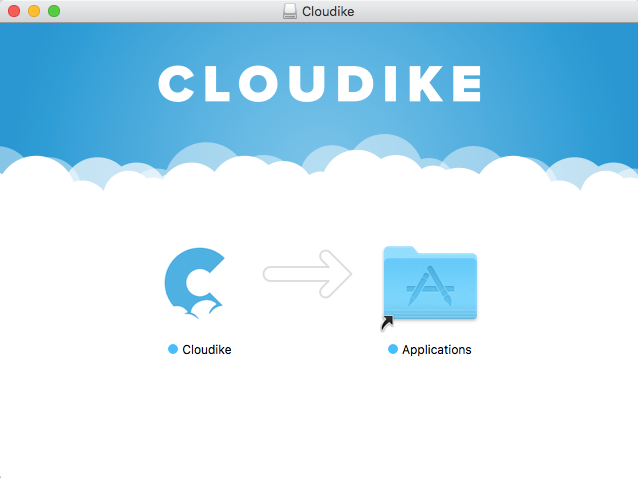
-
Drag-and-drop the Cloudike icon to the Applications folder by clicking of left mouse button.
-
The Cloudike icon appears in the application folder. Double click the Cloudike icon to open the application. The following page appears.

Signing in to the MacOS Desktop
-
If you already have the Cloudike account, sign in or create a new account by clicking Need an account? You only need one account no matter how many devices you want to keep in sync.
-
Fill out the form that appears, which asks either for your Email and a password or for a phone number and a password.

Signing up to the MacOs Desktop
-
Before clicking Sign up, you will also need to check that you accept to Cloudike User Agreement.
-
Click Sign up
-
The following interstitial start screen appears. Click
 to proceed.

Start Screen
- In the appeared window сlick Specify folder location to specify the path to the Cloudike sync folder, content of which will be automatically synchronized with your Cloudike account and files in this folder become available through the website saas.cloudike.com or through the mobile app Cloudike. Typically your Cloudike folder is installed in your user folder (the folder named after your login). However, you can choose any location on your hard drive with this option.
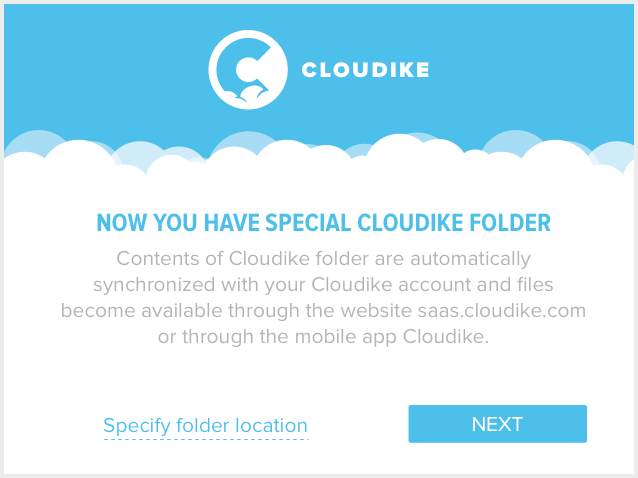
Specifying folder location
- Click NEXT. The following interstitial screen appears. Click Open Extensions preferences to set Cloudike extention on your Mac.
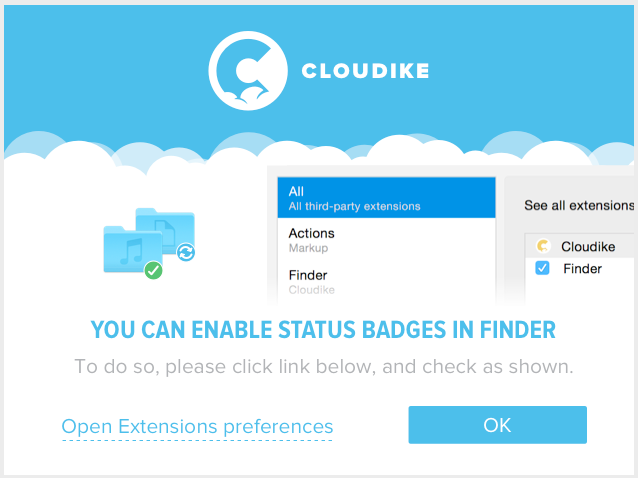
Setting Extensions preferences
- Click OK